Two Point Perspective
Learn:
- What two point perspective is
- How to draw a box in two point perspective
- How to add a roof, doors and windows in two point perspective
- Drawing more objects in two point perspective
What You’ll Need
- Paper
- Pen/Pencil+Eraser (pencil is better, as perspective can be tricky and you may want to erase)
- Ruler (for clear, straight lines)
- An object to draw
What is Two Point Perspective?
Two point perspective is a type of linear perspective that uses lines creates an illusion of space on a 2D surface (the paper). This represents a 3D object.
In the Middle Ages people didn’t understand this concept, which made artworks look flat.

However, during the Renaissance they discovered that every line that is horizontal in reality looks diagonal on paper.

Today, the concept is not as difficult to grasp. This is because when we look at a photograph we can actually see lines moving towards each other. (Towards the vanishing point)

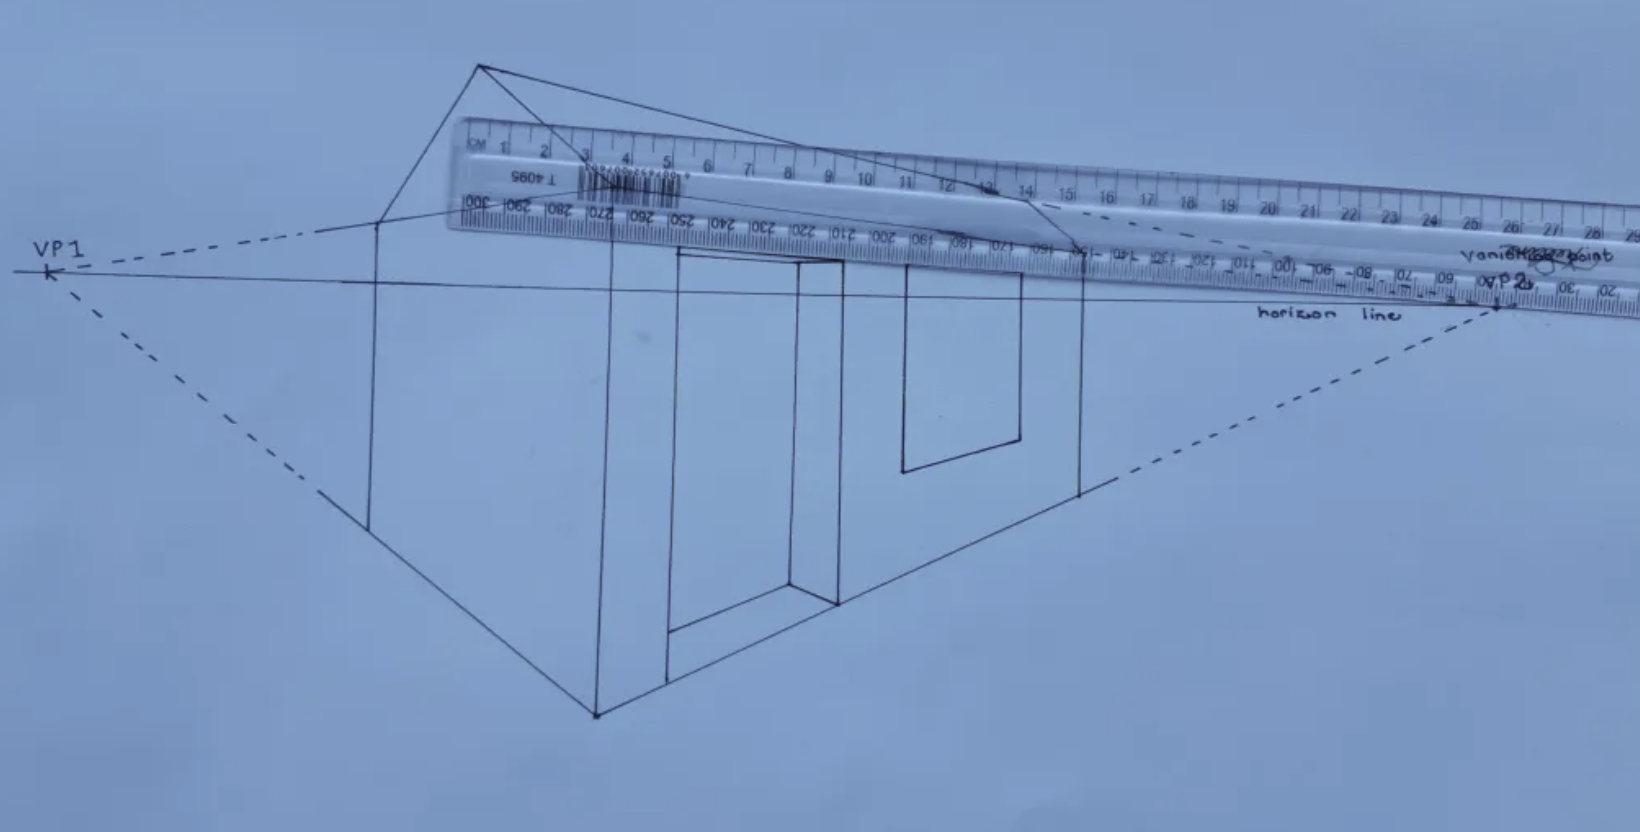
Two Point Perspective – BOX

- Set up your object so that you’re looking at it from an oblique angle.
- Start off by drawing a straight, horizontal line anywhere across your paper. This is the horizon line.
- Add two vanishing points (VPs) along the horizon line, one on the left hand side, the other on the right hand side. Don’t have them too close together.
- Draw a line perpendicular to the horizon line. This is the line of the object that is closest to you as the viewer, the vertical line, let’s call it our ‘watershed’ vertical.
- Next, draw a line from the bottom of the vertical, towards the VP. For greatest ease, rest your pen on the VP, push your ruler against the line and then swivel the ruler to the required position.
- The corner of your box is like the watershed at this point, with the horizontal lines linking up to the vanishing point on either side.
- Draw a line from the top of the vertical towards the VP.
- Simply repeat this for the other side of the vertical.
- Draw another two perpendicular lines to close off the box.


Adding a roof to the box to make it look like a house

- Draw a triangular pitch on the narrowest side of your box. The angles in the bottom part of the pitch should be equal.
- Remember, the diagonals of the pitch do not correlate with the vanishing point.
- Draw a line from the top pitch of the roof to the VP.
- To add the far sided pitch, slide your ruler from your first pitch to the second, so that the two lines are parallel.


Adding doors and windows

- Now things become slightly more complex, as the lines in the doors and windows will correspond first to the VP on the same side as the ‘watershed’ vertical, and then the lines indicating the windowsills or underside of the lintel will correspond with the VP on the opposite side.
- For doors and windows, first draw the vertical line closest to you which will form form the first post of your door.
- Draw the lintel or tops and windowsills next, adding your furthest post last, as this line fits in between the two diagonal lines running towards the VP.
- Next, you will draw in the thickness of the wall and indicate windowsills by drawing lines from the furthest post of your doors and windows to the VP on the opposite side of our ‘watershed’ vertical. This is quite a complex process but … persevere, practice makes perfect!
- Lastly, add in all the other vertical and horizontal lines that show the width of your door and window openings.
- Windows follow the same basic rules. Just make sure that the door lintels and window lintels line up.
- You can use this as a basis for any structure, box, building you would like to draw. Have fun!


Drawing any object that has angular lines

Look around your home for any interesting object you would like to draw. It could be as simple as a box or a more complex shape of a hairbrush, stapler, punch, modem etc.
Apply the same principles as before, starting with a horizon line, VP’s and ‘watershed’ vertical. First draw rough lines indicating the perspective of your object. After that, you can start to show the finer detail of your object, especially if it has curved lines.
Have fun drawing objects convincingly and accurately!
TOP TIP: *Remember, all horizontal lines in real life correspond with a vanishing point. Diagonals in real life DON’T.*
Experiment as much as you like, PRACTICE MAKES PERFECT!!!!
Leave a Reply